
Gel electrophoresis virtual lab answers provide a valuable resource for students and researchers alike, offering an interactive and accessible way to explore the intricacies of gel electrophoresis. This cutting-edge technology has revolutionized the study of molecular biology, genetics, and forensics, enabling scientists to make groundbreaking discoveries and gain a deeper understanding of the genetic code.
Virtual labs offer a safe and cost-effective alternative to traditional laboratory experiments, allowing users to conduct complex procedures without the need for specialized equipment or hazardous materials. With virtual labs, students can visualize and manipulate DNA samples, explore the principles of electrophoresis, and analyze results in a highly interactive and engaging environment.
Gel Electrophoresis Virtual Lab Overview

A gel electrophoresis virtual lab simulates the process of gel electrophoresis, a technique used to separate DNA, RNA, or protein molecules based on their size and charge. Virtual labs provide a safe and convenient way to learn about gel electrophoresis without the need for expensive equipment or hazardous chemicals.
Benefits of using a virtual lab include:
- Safety: No exposure to hazardous chemicals or electrical hazards.
- Convenience: Can be accessed anytime, anywhere with an internet connection.
- Cost-effective: No need for expensive equipment or materials.
- Interactive: Allows users to manipulate variables and observe the results in real-time.
Limitations of virtual labs include:
- May not fully replicate the experience of a real-world lab.
- May require a stable internet connection for smooth operation.
- May not provide hands-on experience with laboratory equipment.
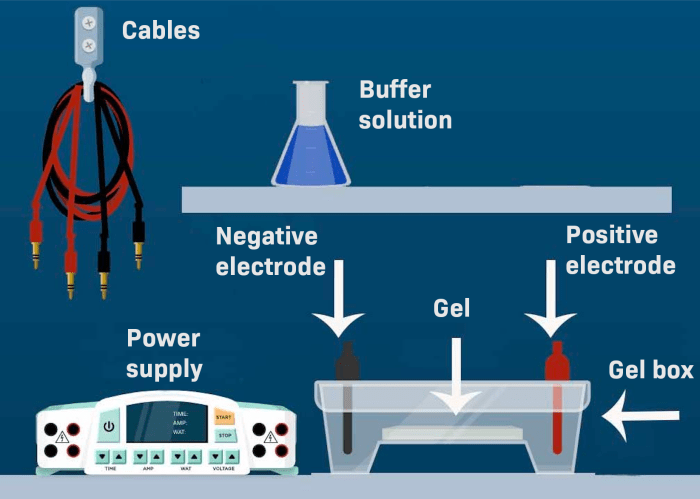
Gel Electrophoresis Procedure
The steps involved in a gel electrophoresis procedure are as follows:
- Prepare the gel:Mix agarose powder with electrophoresis buffer and heat to dissolve. Pour the molten gel into a casting tray and allow it to solidify.
- Prepare the samples:Mix the DNA, RNA, or protein samples with a loading buffer. The loading buffer contains dyes that allow the samples to be visualized during electrophoresis.
- Load the samples:Use a micropipette to load the samples into the wells of the gel.
- Run the gel:Connect the gel to an electrophoresis apparatus and apply an electrical current. The current causes the negatively charged molecules to migrate through the gel towards the positive electrode.
- Interpret the results:After electrophoresis, the gel is stained with a dye that binds to the DNA, RNA, or protein molecules. The stained bands can be visualized under ultraviolet light. The size of the bands corresponds to the size of the molecules.
Virtual Lab Features

Gel electrophoresis virtual labs offer a range of features that enhance the learning experience:
- Interactive simulations:Allow users to manipulate variables such as gel concentration, voltage, and sample concentration.
- Real-time visualization:Enable users to observe the movement of molecules through the gel in real-time.
- Detailed explanations:Provide explanations of the principles and techniques involved in gel electrophoresis.
- Assessment tools:Include quizzes and exercises to test understanding.
Examples of virtual labs that offer interactive simulations include:
- Khan Academy: Gel Electrophoresis
- PBS Learning Media: Gel Electrophoresis
- Bio-Rad: Gel Electrophoresis Virtual Lab
Applications of Gel Electrophoresis
Gel electrophoresis is used in various fields, including:
- Molecular biology:To separate and analyze DNA fragments, such as in DNA sequencing and genetic testing.
- Genetics:To identify genetic mutations and diagnose genetic disorders.
- Forensics:To compare DNA samples from crime scenes and identify suspects.
Examples of how gel electrophoresis has been used to make scientific discoveries include:
- The discovery of the structure of DNA by James Watson and Francis Crick.
- The identification of the genetic mutation responsible for sickle cell anemia.
- The development of DNA fingerprinting, which is used in forensic science to identify individuals.
Troubleshooting Gel Electrophoresis: Gel Electrophoresis Virtual Lab Answers
Common problems that may occur during gel electrophoresis include:
- Blurry or smeared bands:Can be caused by overloading the gel, using too high a voltage, or not running the gel for long enough.
- No bands visible:Can be caused by not loading enough sample, using a gel that is too thick, or not staining the gel properly.
- Uneven migration of bands:Can be caused by a faulty electrophoresis apparatus or an uneven gel.
Troubleshooting tips for resolving these issues include:
- Blurry or smeared bands:Reduce the amount of sample loaded, decrease the voltage, or run the gel for longer.
- No bands visible:Increase the amount of sample loaded, use a thinner gel, or stain the gel for longer.
- Uneven migration of bands:Check the electrophoresis apparatus and the gel for any defects.
To avoid common pitfalls and ensure accurate results, it is important to follow the protocol carefully and use high-quality reagents and equipment.
Query Resolution
What are the benefits of using a gel electrophoresis virtual lab?
Virtual labs offer several benefits, including increased safety, reduced costs, interactive simulations, real-time data analysis, and troubleshooting guidance.
What are the steps involved in a gel electrophoresis procedure?
Gel electrophoresis involves preparing a gel, loading samples, running the gel, and interpreting the results.
How can gel electrophoresis be used in different fields?
Gel electrophoresis has applications in molecular biology, genetics, forensics, and other fields, enabling scientists to analyze DNA samples, identify genetic variations, and solve crimes.
